Game
Design
Workshop |
by Craig Patchett
An Introduction
Hi, and welcome to the column! This is just a brief introduction to let you know what were going to be doing together in the pages to come.
Chances are that one of the biggest reasons you bought your computer (whether you admit it or not) was to play games. Then somewhere along the way you discovered programming, and then came the realization that, "Hey, even I could write a game if I only knew how." Well, maybe it didn't happen quite like that, but I'm sure you know what I mean. In any case, it's true that writing a game isn't really that difficult, at least not a simple game. But unfortunately there aren't too many people willing to explain the techniques involved. You know what I mean, right? After all, chances are you've read all about graphics already, but there's quite a difference between making a spaceship fly around the screen and putting it into a game. That's why this column is here: to explain how to tie everything-including graphics, animation, and sound-together into a complete graphics game. I'll be assuming that you already know the basic techniques involved in player/missile graphics, redefining the character set, display lists and so forth. Although the upcoming columns do include review sections on the topics they cover, it will help you tremendously if you have some previous knowledge.
So much for the graphics. What about the language? We are going to be using BASIC. I'm sure you've read plenty of articles claiming that a good arcade-style game can't be written in BASIC, and it's true. So to help you overcome this obstacle, I've included a variety of machine-language routines that can be used from BASIC quite easily. Rest assured that you don't have to know any machine language in order to use these routines, and they've been designed so that they'll work in a number of different situations, not just the game we'll be designing in this column.
Even with the machine-language help, it's still true that BASIC will not allow you to do games as complicated as Donkey Kong or Defender; at least not with the speed of the arcade versions. So the question comes up as to what would be a good game to use as an example. We need something that utilizes as many of the graphics tricks as possible, while at the same time isn't too complicated so as to slow things down to a ridiculous rate. Also, it should ideally be something familiar, so that it is immediately clear how things should be working. What, if anything, fits these conditions? We decided on Invaders as our model.
Graphics
fundamentals
A big part of computer graphics, and one that not
many people think about, is the television set. After all, were not
drawing on a piece of paper, and the way that a TV set works has a lot
to do with what the computer puts on the screen. More importantly, it
has a lot to do with how the computer puts things on the screen. So, as
one final step before we actually start going wild, let's take a good
look at that screen.The Screen
Let's begin with the basics, since I can't think of a better place. Do you know what the screen is made of? Well, I know that glass is probably the most obvious answer, but it goes much further than that. Look at the screen of a TV set that's not on. See how the back of the glass is coated with something? That something is called "phosphor." The neat thing about phosphor is that it glows when you hit it with electrons. The more electrons that hit it, the brighter it glows (don't worry if you don't know what electrons are, just think of them as real tiny pellets... real tiny).
 Behind the screen (near the back of
the TV set),
there is an electron gun that shoots a beam of electrons at the screen
to make it glow. Pretty simple so far, right? This beam is pretty small
and can only hit a small dot of phosphor at any one time. In order for
it to make all of the phosphor on the screen glow, then, it scans the
screen, much in the same way as we scan a book while reading. The beam
starts at the upper left-hand corner of the screen and goes all the way
over to the right-hand side, drawing a line as it goes. This line is
called, appropriately, a "scan line" (if you look closely at your
screen, you can see these lines; don't look for too long, though). When
it gets to the right-hand side of the screen, the beam turns off and
moves over to the beginning of the next line, where it preceeds to draw
the next line. This happens over and over again until the beam has
drawn the entire screen. (See Figure 1.)
Behind the screen (near the back of
the TV set),
there is an electron gun that shoots a beam of electrons at the screen
to make it glow. Pretty simple so far, right? This beam is pretty small
and can only hit a small dot of phosphor at any one time. In order for
it to make all of the phosphor on the screen glow, then, it scans the
screen, much in the same way as we scan a book while reading. The beam
starts at the upper left-hand corner of the screen and goes all the way
over to the right-hand side, drawing a line as it goes. This line is
called, appropriately, a "scan line" (if you look closely at your
screen, you can see these lines; don't look for too long, though). When
it gets to the right-hand side of the screen, the beam turns off and
moves over to the beginning of the next line, where it preceeds to draw
the next line. This happens over and over again until the beam has
drawn the entire screen. (See Figure 1.)There are over 200 lines that have to be drawn, but the beam gets it all done in less than 1/60 of a second! Unfortunately, the phosphor won't glow forever, and by the time the beam reaches the bottom of the screen, the top is starting to fade. So the beam turns off, goes back to the top again and starts over. This means that the screen actually gets drawn 60 times a second. Now this may sound like a pain in the you-know-what, but it actually turns out to be somewhat of a blessing. You've probably seen, in one form or another, those little cartoon books that you flip through to make the pictures look like they're moving, right? Movies work the same way. They show you a picture, then blank the screen and show you another one that's just a little bit different. This is what creates the illusion of motion. Thus, if a different picture is drawn on the screen each time the beam goes over it, we can create motion. If the beam didn't redraw the screen so rapidly, we'd just have an expensive slide show.
Alright, now you know the basics of television, but what does this have to do with computers? Quite a bit, actually, as you'll soon see. If you're programming from BASIC, then all you need to worry about is knowing the various terms. Well go over those in a second. Machine-language programmers, on the other hand, are programming in a language that works almost as fast as the electron beam, so they can have greater control over the screen. That's why so many incredible things can be done from machine language that can't be done from BASIC. Machine-language programmers need to know exactly how the beam draws the screen, because they can take advantage of it. So if you're a BASIC programmer, this short instruction to the world of the TV set has been a learning experience (surprise). If you program in machine language, there's a lot more you can learn if you really want to be able to make the computer say "Uncle:" Not many people do.
Terms, terms, terms. Actually, in this column there are only a few that we'll be using, but the above explanation of the TV set was necessary for you to be able to completely understand what they mean. So, without any further ado, here they are:
Scan Line: This one you already know. A scan line is simply a horizontal line on the screen, as drawn by the electron beam. The screen is made up of several hundred scan lines, one on top of the other.
Vertical Blank: Also known as VBLANK and Vertical Refresh. I prefer VBLANK. In any case, VBLANK is the time during which the electron beam is off and on its way from the bottom of the screen back to the top. It happens 60 times a second, since that's how often the beam draws the screen.
Horizontal Blank: Also known, strangely enough as HBLANK and Horizontal Refresh. Guess which I prefer! HBLANK is the time during which the electron beam is off and on its way from the end of one scan line to the beginning of the next. HBLANK happens a lot more often than VBLANK (over 200 times more often).
Well, that's it! That's right, all of this for only three simple terms. In the columns ahead, however, you'll be seeing these terms a lot, especially "scan line" and "VBLANK," so please make sure they become a part of your vocabulary.
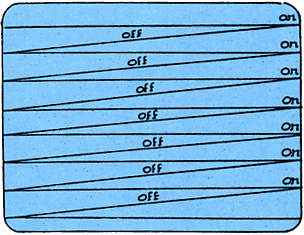 Figure 1. |
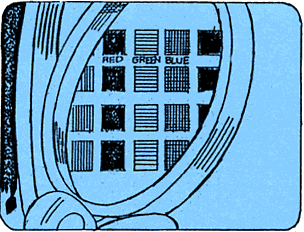 Figure 2. |
TEXT MODES SUMMARY
| Display Type |
Graphics Mode Number |
Screen Size (column x rows) |
Memory Used (bytes) |
Colors Available |
Forground Color Register |
Background Color Register |
Border Color Register |
| Normal text |
0 |
40 x 24 |
992 |
1 color 2 luminances |
1 |
2 |
4 |
| Double-width text |
1 |
20 x 20,
split 20 x 24, full |
674, split 672, full |
5 |
0,1,2,3 |
4 |
4 |
| Doble-width, double-height text |
2 |
10 x 20,
split 12 x 20, full |
424, split 420, full |
5 |
0,1,2,3 |
4 |
4 |
| Multicolor text |
12 |
40 x 20,
split 40 x 24, full |
992 |
5 |
0,1,2,3 |
4 |
4 |
| Large multi- color text |
13 |
40 x 10,
split 40 x 12, full |
512 |
5 |
0,1,2,3 |
4 |
4 |
Table 1
Table 2

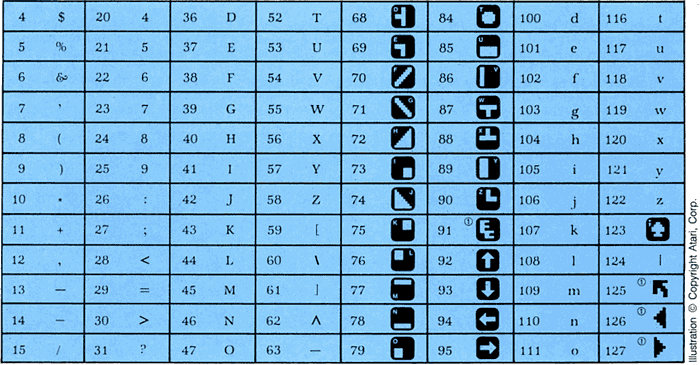
1. In mode 0 these
characters must be preceded with an escape, CHR$(27), to be printed.
Table 3
A little bit more
This section is for those of you with a little bit of curiosity. You don't need to read it, but you may find it interesting nonetheless. Way back near the beginning of this column, I mentioned that the greater the number of electrons that hit the phosphor on the screen, the brighter the phosphor glows. What I didn't say was that this is very important to the creation of the picture. After all, a black and white picture isn't all black and white, is it? There are all kinds of grays as well.
As the electron beam scans the screen, its intensity varies, thus varying the number of electrons that hit the screen. This, in turn, causes the brightness of the screen to vary between black (no electrons) and white (lots of electrons), allowing for all the shades of gray. This is how a black and white picture is created.
But what about color? Well, color pictures are nothing more than black and white ones with color added. Now I know that sounds kind of obvious, but it's an important thing to keep in mind. A color picture is drawn in exactly the same way as a black and white one, except in color. The question remains, of course, as to how that color is created.
If you take a close look at the screen of most color TVs, you should be able to see little red, green and blue stripes. These stripes are so small that their colors blend together when you look at the screen from a normal distance. Some of you may know the significance of these three colors already. We call them the electronic primary colors because all other known colors can be created by mixing one or more of the three together. For example, mixing yellow with blue gives green, and yellow with red gives orange. Can you see now what's going on? A color TV actually draws three pictures on the screen; a red and white one, a green and white one and a blue and white one. The three blend together to give you a genuine full-color picture. (See Figure 2.)
And you thought it was something complicated! Anyway, that's about all I wanted to tell you about your television set. If you have a monitor, don't worry-the basic principals are the same.
Screen memory
So far we know that a TV picture is drawn with an electron beam that scans across the screen. But how does the beam know what needs to be drawn? In the case of regular TV, it receives a signal from your antenna or cable system. In the case of the computer, the computer itself sends out the information. Inside your Atari is a chip called GTIA which is responsible for controlling the electron beam. Actually, it just controls the intensity of the beam. As you might recall, the more intense the beam, the brighter the phosphor; so a picture is drawn by rapidly varying the intensity of the beam. Anyway, that's GTIA's responsibility. GTIA, however, still needs to know what it's supposed to be telling the electron beam, right? Somewhere inside the computer then, there must be a description of what the screen is to look like. There is, and it's in a special section of memory called, strangely enough, screen memory. In this section, we're going to take a look at how screen memory works.
Before we get into the heavy details, let's look at the basic idea. Screen memory is made up, like all other memory, of a whole bunch of bytes. In one way or another (we'll get into it later), GTIA looks at these bytes, interprets them, and then sends the information to the electron gun. The first byte in screen memory will determine what the upper left-hand corner of the screen will look like, the last will determine what the lower right-hand corner looks like. That should make sense, of course, since that's the order that the electron gun would expect. Depending on the graphics mode being used, the screen can be anywhere from ten to 40 bytes across, and from 12 to 192 down. We'll see why in a little bit. For now, let's take a look at just how GTIA interprets the bytes in screen memory.
Character-graphics modes 0, 1 & 2
We'll begin by taking a look at the character-graphics modes (GRAPHICS 0/1/2). In these modes, there is one byte in screen memory for each possible character on the screen. This is summarized in Table 1.
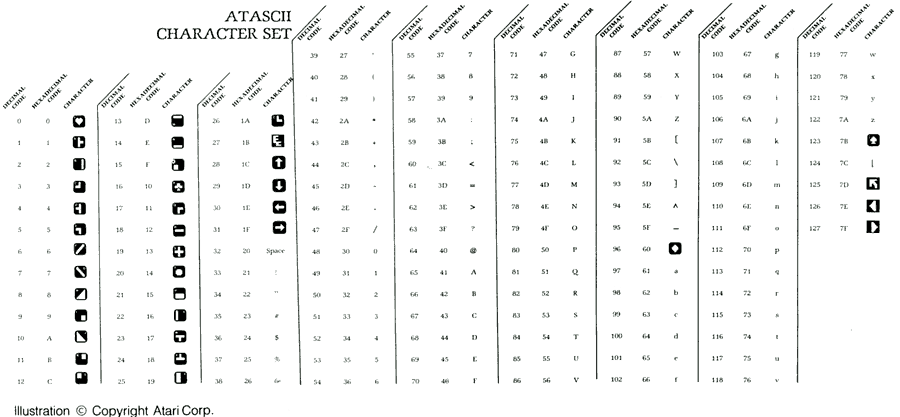
Do you know what ATASCII values are? Each Atari character has a number assigned to it, between 0 and 255, and these numbers are called ATASCII (ATAri Standard Code for Information Interchange) values. You've also probably heard of something called the "Internal Values:" The internal values are what we are interested in, since these values are the ones used by screen memory and GTIA. (See Tables 2 and 3.) As a matter of fact, all screen memory in the character modes is a list of these internal values. GTIA looks at this list, sees what is currently on, then looks into another list called the "character set" (we'll go over the character set in a future column) to see what this particular character looks like. GTIA then sends this information to the electron gun which in turn causes the beam to draw the character (it's not really quite that simple, but this is all you need to understand). Why don't we see an example of this in action. First we'll find out where screen memory is. The following line will do the trick for us:
100 SCRMEM=PEEK(88)+PEEK(89)*
256
Memory locations 88 and 89 hold the address of the beginning of screen memory.
Now let's try POKEing the internal value for "HI" into screen memory. The letter "H" has an internal value of 40, and "I" has an internal value of 41. So we do the following:
110 POKE SCRMEM,40:POKE SCRM
EM+1,41
Viola! We've now changed screen memory. If you don't have the word "HI" in the upper left-hand corner of your screen right now, it's probably because your screen is full and it got scrolled off. Add the following line to the program and try again:
99 GRAPHICS 0
What if we wanted to have "HI" written vertically instead of horizontally? Try making the following change:
110 POKE SCRMEM,40:POKE SCRM
EM+40,41
Do you understand why we added 40 to SCRMEM to get the "I" to print below the "H"? Remember that graphics mode 0 has 40 characters on each line, and that each character takes up one byte in screen memory. That means that the first character on the second line is the 41st byte in screen memory. SCRMEM is the address of the first byte, so SCRMEM + 40 is the address of the 41st. Now try changing Line 99:
99 GRAPHICS 1
What happened? Now the "I" is two lines below the "H:" You should be able to figure out why by yourself this time, but I'll give you a hint just in case: There are only 20 characters on a graphics mode 1 line.
Before we leave the wonderful world of character graphics, we need to bring up a few more things. First of all, if you've looked at the ATASCII table yet, you've probably noticed that there are only 128 characters in the character set. But each byte in screen memory can hold a number between 0 and 255, or a total of 256 numbers. What about the other 128 characters? Well, if GTIA sees a character value greater than 127 (in other words, if bit seven is set) then it takes the value, subtracts 128 from it to get a new value, and then puts the character with this new value up on the screen in inverse video. Inverse video is what you get when you type a character after pressing the inverse key (the key with either the Atari logo or a half-full square on it, depending on which Atari computer you have). So, for example, an inverse video "H" would have a value of 168 (40 + 128).
As if that's not enough, we still have something else to clear up; only this time it concerns graphics modes 1 and 2. In these modes, you can only use half the character set at a time (either uppercase and numbers or lowercase and graphics), and there is no inverse video. Why? Because in these modes, bits six and seven of the character values are used to specify the character color, which means that characters in these modes can be one of four colors. Here's how it works: GTIA gets the character value and looks at bits six and seven. Then, depending on how the bits are set, it goes to one of the Atari color registers to see what color is desired and puts the character up on the screen in that color. A color register is just a memory location that affects the colors of objects on the screen. When you use the SETCOLOR command, you are actually just setting the value in one of the registers. Anyway, here's a list of the different bit combinations and the color registers they refer to:
|
|||
|
Here's a simple program that will put the letter "H" on the screen in all four colors:
100 GRAPHICS 2
110 SCRMEM=PEEKC88)+PEEK(89)
*256
120 POKE SCRMEM+1,46
130 POKE SCRMEM+2,40+64
140 POKE SCRMEM+3,40+128
150 POKE SCRMEM+4, 40+192
After running this program, you might like to play with the SETCOLOR command to see the effect of changing the various color registers. By the way, to switch to lowercase, try POKE 756,226. Use POKE 756,224 to get back to uppercase.
Now that we (hopefully) have a grasp of how GTIA and screen memory work with characters, let's take a look at graphics. We'll start with graphics mode 8, since it's a little easier to understand than the others. In graphics mode 8, the screen is made up of some 61,440 dots that can be turned on or off (320 across by 192 down). Does that phrase "on or off' ring a bell? We ran across it before when we were talking about bits which, I'm sure you'll recall, can be turned on or off just like the dots on the screen. The way graphics mode 8 works then, is that each bit in screen memory represents a dot on the screen. Turn a bit on and the corresponding dot will also turn on. Turn it off and, well, you guessed it. Because there are 8 bits in a byte, and there are 320 dots across a graphics mode 8 screen, it takes 40 bytes (320/8) of screen memory for each graphics mode 8 line. That's a total of 7,680 (40*192 or 61,440/8) bytes of screen memory altogether, which is obviously a lot better than 61,440! Now this system does have its disadvantages, since one byte holds eight dots instead of just one. Turning individual bits on and off can be very frustrating, especially from BASIC. In other words, there are very few times when you'll want to go in and change this kind of screen memory directly. It's a lot easier to PLOT and DRAWTO. In one of the upcoming columns, however, we will see a time when the ability to change it directly will come in handy. In the meantime, let's take a look at the other graphics modes.
GRAPHICS
MODES 4 & 6 SUMMARY
| Display Type |
Screen Size (columns x rows) |
Memory Used (bytes) |
Default Colors |
SETCOLOR (n) |
POKE address |
COLOR (n) |
||||
| Graphics 4 Graphics 6 |
|
|
Orange Black |
0 4 |
708 712 |
1 0 |
TABLE
4 Applies to both modes.
GRAPHICS
MODES 3, 5, & 7 SUMMARY
| Display Type |
Screen Size (columns x rows) |
Memory Used (bytes) |
Default Colors |
SETCOLOR (n) |
POKE address |
COLOR (n) |
|||||||||
|
|
|
Orange Light-green Blue Black |
0 1 2 4 |
708 709 710 712 |
1 2 3 0 |
TABLE
5 Applies to all three modes
The other graphics modes
Graphics modes 4 and 6 are similar to graphics mode 8 in that each dot can either be on or off. Thus screen memory works in exactly the same way as we just discussed. The difference is that the dots are larger, which means there are less of them on the screen, which in turn means that screen memory is smaller. Table 4 summarizes these differences.
Graphics modes 3, 5 and 7 introduce a new twist. In these three modes, not only can the dots be on but when they are on, they can have one of three colors. This means that there are four possibilities for each dot instead of just two. How do we deal with this? Actually, the solution is quite simple; we use two bits for each dot instead of just one. Two bits can be arranged in four combinations (00,01,10,11), which is exactly what we need. So, in the four color modes, each byte of screen memory holds four dots instead of eight. Table 5 has all the information.
Before we continue, there's something I forgot to explain. GTIA knows from the two bits which of the four colors to give a particular dot, but how does it know what the four colors are? After all, the Atari has a total of 256 to choose from. It turns out we already know the answer from our discussion on graphics modes 1 and 2 above, so there's no point in going over it again here. There is a small difference, however, in that the bit combinations don't refer to the same color registers as they did for the characters. The following table shows how it works for graphics:
|
|||
|
We've now covered all the modes except three, and those three aren't too tough to cover since they work in much the same way as the four color modes we just discussed. Before we take a look at them, however, I should point out that not all Atari computers have them. You see, the first Ataris to roll off the assembly lines didn't have the GTIA chip. Instead, they had a stripped-down version called CTIA. The only real difference between the two chips is that CTIA doesn't have the three modes we are going to talk about, namely graphics modes 9, 10 and 11.
 Well look at modes 9 and 11 first,
since they are
perhaps a little more straightforward than mode 10. In these two modes,
you can have 16 (count 'em) colors on the screen at once, but with a
sacrifice. The dots are as high as the ones in graphics mode 8, but
they're four times as wide. This makes the screen 80 dots wide by 192
high. Why are the dots so wide? Well, it takes four bits, or half a
byte, to store a number between 0 and 15, which is what is needed to
get 16 colors. That translates to 32K of screen memory if the dots were
to be the same size as those in graphics mode 8. Even if they were only
twice as wide as a graphics mode 8 dot, they would still need 16K of
screen memory. Atari evidently figured that this was just too much
memory (there were other more complicated factors as well). Anyway,
that's the way things go.
Well look at modes 9 and 11 first,
since they are
perhaps a little more straightforward than mode 10. In these two modes,
you can have 16 (count 'em) colors on the screen at once, but with a
sacrifice. The dots are as high as the ones in graphics mode 8, but
they're four times as wide. This makes the screen 80 dots wide by 192
high. Why are the dots so wide? Well, it takes four bits, or half a
byte, to store a number between 0 and 15, which is what is needed to
get 16 colors. That translates to 32K of screen memory if the dots were
to be the same size as those in graphics mode 8. Even if they were only
twice as wide as a graphics mode 8 dot, they would still need 16K of
screen memory. Atari evidently figured that this was just too much
memory (there were other more complicated factors as well). Anyway,
that's the way things go.The screen memory for modes 9 and 11 works, as you may have suspected, in exactly the same way as for the other color modes except that now there are four bits per dot instead of two. Well, not quite. Remember how I said before that there are five color registers? If that's true then, how do we pick the 16 colors we want to use for these two modes? As you probably know, the Atari computers give you a total of 256 colors to choose from altogether, made up of 16 hues (types of color) and 16 luminances (brightnesses). Sixteen times 16 gives us 256. Sixteen is also an awfully familiar number. By no small coincidence, graphics mode 9 lets us use all 16 luminances (but only one hue), and graphics mode 11 lets us use all 16 hues (but only one luminance). That way, in graphics mode 9 we only have to store the value of the hue we want in one of the color registers (color register four, of the background register) and then use screen memory to specify the luminance of each dot. Similarly, in graphics mode 11 we store the luminance value in color register four and use screen memory to specify the hue of each dot.
Now we have a way to get 16 colors on the screen at the same time, but we're restricted to them all having either the same hue or the same luminance. Is there any way to get more than five colors on the screen without these restrictions? The answer is yes, and the solution is graphics mode 10. Before we look at this mode, however, let's take another look at the color registers. We saw earlier that there are five playfield color registers, with "playfield" being a fancy name for anything that's put on the screen using screen memory. So far we haven't seen how to put things on the screen in any other way, but there is something called "Player/Missile Graphics," or "PMG" for short, that provides an alternative. I won't go into detail on PMG here since there is a whole column devoted to the subject later, but for now you should be aware that there are four player color registers in addition to the playfield color registers, for a grand total of nine color registers in all. Graphics mode 10 lets you use all of these registers to get any nine colors on the screen at once.
You'd think that graphics mode 10 would take less screen memory than modes 9 and 11, right? After all, it only has nine colors per dot instead of 16, so it should take less bits per dot. Sounds good, but unfortunately things don't quite work that way. Four bits will hold a value between 0 and 15; we already know that. But three bits will only hold a value between 0 and 7. In order to get nine colors, we need to store a value between 0 and 8. Alas, that means we have to use four bits and just not use some of the possible values (9 through 15). And this in turn means that the dots in graphics mode 10 are going to be exactly the same size as those in modes 9 and 11. This time, however, screen memory will work in the same way as it did with the four color modes, except now all nine color registers can be accessed.
The color registers that don't have a SETCOLOR value beside them are the player color registers. You'll see how to set the color values for these registers in a future column on bit-mapped graphics.
We've now covered all the modes (Yipee!), and you should hopefully have a good grasp of what screen memory is and how it works for each of the 12 graphics modes. This knowledge will come in handy, since the concept of screen memory is one that will come up again and again.